Introduction
The Windows Debugger (WinDBG) is a debugger developed by Microsoft and offers several features such as
analyzing crash dumps, live debugging of user-mode and kernel-mode code and examining both CPU registers
as well as memory. Although it doesn't offer the full-fledged capabilities such as IDA Pro and Ghidra
offer, it is quite versatile. I have used WinDBG in multiple occasions and come to like its scripting
capabilities, as well as its still relatively new support for Time Travel Debugging (TTD).
Over a period of about 9 months, I spent quite a chunk of my time researching if one could automate the
process of generating fuzzing harnesses. I will likely write a separate blog post about this in the
future. During this research, I utilized WinDBG mainly for generating TTD traces, as well as the main
topic of this blog post: building my own WinDBG extension. The goal of the WinDBG extension was to
assist in the automated generation of fuzzing harnesses based on a captured run trace of an application
that was subjected to fuzzing efforts. Let's shortly dive into TTD before we continue with how to build
your own WinDBG extension.
Time Travel Debugging
One of the main features of WinDBG is its Time Travel Debugging mode. Time Travel Debugging is a
relatively new feature in the arsenal of the Windows Debugger (WinDBG) which allows for recording a full
run trace of an application. The subsequent capture is stored and allows for unlimited replays of the
behaviour of the application during the application. Although changing memory layouts and similar
actions are not possible, it allows for fine-grained control over the execution process. Its main
feature is of course the possibility to replay the behaviour. This ensures that in debugging and other
use cases, the application does not need to be rerun over and over again with all of its corresponding
negative effects as well as uncertainties and inconsistencies between multiple runs.
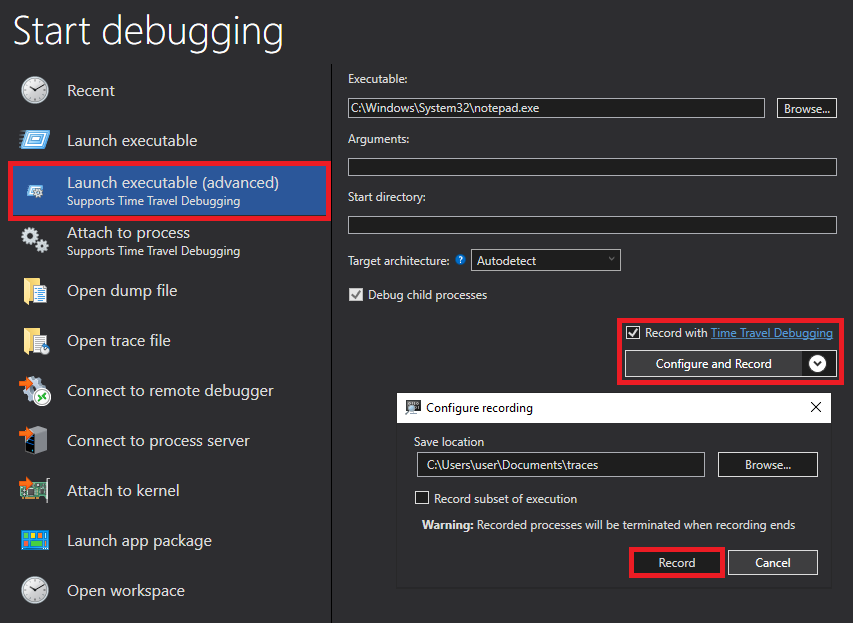
Using WinDBG, Time Travel Debugging can easily be configured by starting the debugging process,
selecting "Launch executable (advanced)" and checking the "Record with Time Travel Debugging" checkbox,
before configuring the location to save the trace, as shown below.
Setting the scene
Within the scope of my aforementioned research one of the key focus points was "process automation".
Since at the time I had limited experience with WinDBG, I went out on a journey to better understand
what WinDBG has to offer. Amongst others, I discovered that the Windows Debugger exposes multiple header
files that can be used to develop an extension which in turn would be able to assist my research in
achieving some form/level of automation. I have found the documentation on the Windows Learn
website to be of some use. Simultaneously, this documentation is very limiting and barely
describes how to setup your development environment, how a plugin base frame looks like and how to
deploy it within the Windows Debugger.
Please do note, that in my personal opinion, my experience is still limited, and I am sure that
individuals with more C/C++ programming experience undoubtedly will be able to point out misconceptions,
flaws and other inconsistencies. The goal of this blog post is mainly to serve as a guiding hand on how
to get started.
Loading an extension in WinDBG
WinDBG extensions can be found aplenty on the internet and subsequently loaded into the WinDBG
instance. There are two distinct locations to store an extension and subsequently load it. Basically,
any directory on your operating system will do. Using the .load
command in the debugger an extension can be loaded using the full path to the location of the
extension. Alternatively, one can first use the .extpath command, to
obtain a full list of paths where WinDBG will automatically load extensions from. Placing the extension
into one of these folders subverts the requirement to use the full path to load the extension.
Based on the information on the Windows Learn page, it is possible to write your own WinDBG extension in
C++ as a DLL. Using the command .load and supplying the location of the
extension DLL file, WinDBG will be able to add a new "feature" to WinDBG which can then be called. A lot
of the things that I learned were based on this
blog from 2004(!) which provided the essential baseline.
Starting the development process
WinDBG extensions are essentially Dynamic-Link Libraries (DLL) that add complementary functionality to
your WinDBG sessions. As such, we can use Visual Studio to create a new Dynamic-Link Library project
which will already create a dllmain.cpp file and set several compiler
features that will ensure we can directly build a DLL. As we will be using WdbgExts Extension Callbacks,
more on this later, we can follow the guidance given by Microsoft.
We are required to export certain functions in addition to the default APIENTRY DllMain:
- A function named
WinDbgExtensionDllInitwith three arguments: - A pointer to a
WINDBG_EXTENSION_APISstructure - A major version number
- A minor version number
- A function called
ExtensionApiVersion -
And lastly, quite straightforward, at least one function declared using the
DECLARE_APImacro that can be called from within WinDBG.
Let's assemble each of these three pieces separately before then combining them into one functioning
piece of code:
The WinDbgExtensionDllInit function:
VOID WDBGAPI WinDbgExtensionDllInit(PWINDBG_EXTENSION_APIS lpExtensionApis, USHORT usMajorVersion, USHORT usMinorVersion) {
    // More code here later
}
The ExtensionApiVersion function with the required Major and Minor version as well as the
Revision and Reserved fields:
EXT_API_VERSION g_ExtApiVersion = { 1, 1, EXT_API_VERSION_NUMBER, 0 };

LPEXT_API_VERSION WDBGAPI ExtensionApiVersion(void) {
    return &g_ExtApiVersion;
}
A simple API function called demo_ext which we can later call from within our WinDBG
session:
DECLARE_API(demo_ext) {
    // More code here later
}
Building our "Hello World" WinDBG extension
Now that we have incorporated the first pieces of code, it is time to chain them and make them into a
usable WinDBG extension. For this, we first need to have a look at the libraries that need to be
included. We will leave windows.h for what it is, this include should be clear.
Additionally, we require the WinDBG debugger extension interface, which is defined in the header file:
wdbgexts.h for, amongst others, the EXT_API_VERSION structure.
Correspondingly we also require the debugger engine interface dbgeng.h
which provides us with a valuable interface to perform all kinds of tasks.
Our first task will focus on around obtaining the correct interfaces and handles to print a
simple "Hello World" within the WinDBG session. For this, we need to call the DebugCreate()
function that will return an interface pointer to the client object. In our case, we will always need to
obtain an interface pointer to the main IDebugClient interface. With the obtained interface
pointer to the Debug Client, we can obtain further handles to other IDebugClient, IDebugControls and
more interfaces. Each interface, listed here,
contains one or more functions that may come in handy during the automation process.
Using the IDebugClient QueryInterface function, we can obtain a handle to the
IDebugControl interface. This interface has a member function named
ControlledOutput which allows us to print strings to the WinDBG Command interface. View the
code sample below which demonstrates the full code to achieve our goal of printing "Hello World" to said
command interface.
#include <windows.h>

#define KDEXT_64BIT
#include <wdbgexts.h>
#include <dbgeng.h>

#if defined(WIN32)
#pragma comment(lib, "Dbgeng.lib")
#endif

EXT_API_VERSION g_ExtApiVersion = { 1, 1, EXT_API_VERSION_NUMBER, 0 };
WINDBG_EXTENSION_APIS ExtensionApis = { 0 };
IDebugClient* g_Client = NULL;
PDEBUG_CONTROL g_Control = NULL;

VOID WDBGAPI WinDbgExtensionDllInit(PWINDBG_EXTENSION_APIS lpExtensionApis, USHORT usMajorVersion, USHORT usMinorVersion) {
    if (DebugCreate(__uuidof(IDebugClient), (void**)&g_Client) != S_OK) {
        MessageBoxA(0, "DebugCreate() failed", __FUNCTION__, MB_ICONERROR);
        return;
    }

    if (g_Client->QueryInterface(__uuidof(IDebugControl), (void**)&g_Control) != S_OK) {
        MessageBoxA(0, "DebugClient::QueryInterface(IDebugControl) failed", __FUNCTION__, MB_ICONERROR);
        return;
    }
}

LPEXT_API_VERSION WDBGAPI ExtensionApiVersion(void) {
	return &g_ExtApiVersion;
}

BOOL APIENTRY DllMain(HMODULE hModule, DWORD ul_reason_for_call, LPVOID lpReserved) {
    switch (ul_reason_for_call)
    {
    case DLL_PROCESS_ATTACH:
    case DLL_THREAD_ATTACH:
    case DLL_THREAD_DETACH:
    case DLL_PROCESS_DETACH:
        break;
    }
    return TRUE;
}

DECLARE_API(demo_ext) {
    g_Control->ControlledOutput(DEBUG_OUTCTL_AMBIENT_DML, DEBUG_OUTPUT_NORMAL, "<col fg=\"srcpair\">Hello World from the WinDBG extension</col>\n");
}
Before we can compile the DLL into a working extension, we need to create and include one more file: the
definition file which will be used in the linker process. Create a definition file like:
demo_ext.def and include the following text:
LIBRARY "WINDBG.DLL"
EXPORTS
WinDbgExtensionDllInit
ExtensionApiVersion
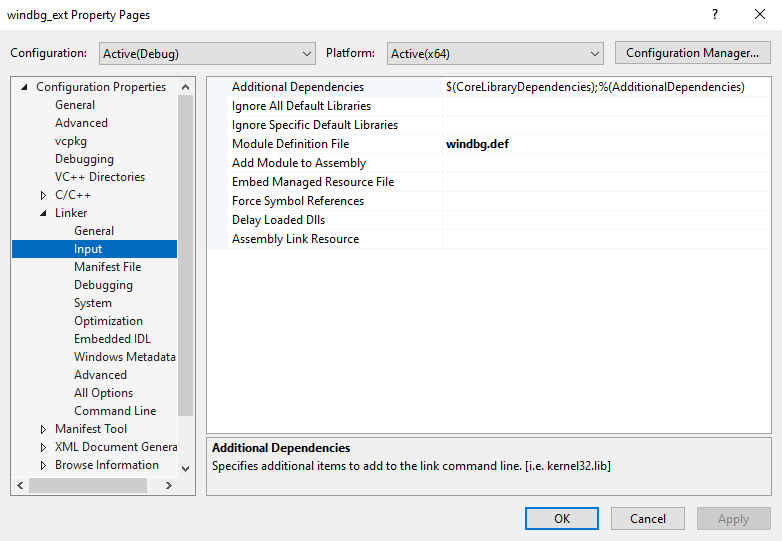
demo_extThen, include the relative path to this file in the Model Definition File field within your linker. See the example below for including it in the linker process for Visual Studio 2022.
Now, we can compile our extension, load it into the WinDBG session and execute our custom API
demo_ext. Note, that we load the extension DLL from the default folder that Visual Studio
will put the compiled binary in, as such requiring us to include the full path as opposed to first
copying the compiled DLL to a winext folder and then including it directly from that
specific folder. Additionally, we need to call the API using the name of the DLL and adding the API
function to it.

Handling EventCallbacks
WinDBG allows you to subscribe to events that are fired by the debugging engine and take over these
events by adding additional code that will be executed whenever an event to which you have subscribed is
fired. An example: you are using the Time Travel Debugging feature to parse the execution flow of a
capture debugging session. Once you have hit the end of the time travel trace, you would want to
automatically start from the beginning again. To do this, you can subscribe to the
ChangeEngineState EventCallback, and listen for the combination of the
DEBUG_CES_EXECUTION_STATUS Flag and DEBUG_STATUS_BREAK Argument which signal
the end of the time travel trace has been reached. Subsequently you can then use the
Execute function, through the IDebugControl interface to restart the trace
from the beginning.
These callbacks interfaces function like COM which requires default functions like AddRef
and Release. Additionally, we need to register our "interests" for specific debug events
using the GetInterestMask function.
Once we have laid this foundation, we can implement the 4 main EventCallbacks: Breakpoint, LoadModule,
ChangeEngineState and Exception. For this example, we are only interested in the Exception
EventCallback. As such, we implement the other callbacks only to return a status code signaling the
debugging engine that no change has been implemented and control is given back to the debugging engine.
First we require a header file to define the EventCallbacks class and the functions within the class:
#pragma once
#include <windows.h>

#define KDEXT_64BIT
#include <wdbgexts.h>
#include <dbgeng.h>
#if defined(WIN32)
#pragma comment(lib, "Dbgeng.lib")
#endif

LONG g_RefCount = 0;

class EventCallbacks : public DebugBaseEventCallbacks
{
public:
	// IUnknown
	STDMETHOD_(ULONG, AddRef)(THIS);
	STDMETHOD_(ULONG, Release)(THIS);

	// IDebugEventCallbacks
	STDMETHOD(GetInterestMask)(THIS_ OUT PULONG Mask);
	STDMETHOD(Breakpoint)(THIS_ IN PDEBUG_BREAKPOINT Bp);
	STDMETHOD(LoadModule)(THIS_ IN ULONG64 ImageFileHandle, IN ULONG64 BaseOffset, IN ULONG ModuleSize, _In_opt_ PCSTR ModuleName, _In_opt_ PCSTR ImageName, IN ULONG CheckSum, IN ULONG TimeDateStamp);
	STDMETHOD(ChangeEngineState)(THIS_ IN ULONG Flags, IN ULONG64 Argument);
	STDMETHOD(Exception)(THIS_ IN PEXCEPTION_RECORD64, IN ULONG FirstChance);
};
Now that the header file has been constructed, we can implement each of the functions within the main cpp file. For demonstration purposes, we will work within one dedicated header and one dedicated cpp file. In real world settings, I recommend splitting functionality and keeping your files clean as much as possible. Our main cpp will now look like:
#include "Header.h"

EXT_API_VERSION g_ExtApiVersion = { 1, 1, EXT_API_VERSION_NUMBER, 0 };
WINDBG_EXTENSION_APIS ExtensionApis = { 0 };
IDebugClient* g_Client = NULL;
PDEBUG_CONTROL g_Control = NULL;
PDEBUG_BREAKPOINT p_Breakpoint;

VOID WDBGAPI WinDbgExtensionDllInit(PWINDBG_EXTENSION_APIS lpExtensionApis, USHORT usMajorVersion, USHORT usMinorVersion) {
    if (DebugCreate(__uuidof(IDebugClient), (void**)&g_Client) != S_OK) {
        MessageBoxA(0, "DebugCreate() failed", __FUNCTION__, MB_ICONERROR);
        return;
    }

    if (g_Client->QueryInterface(__uuidof(IDebugControl), (void**)&g_Control) != S_OK) {
        MessageBoxA(0, "DebugClient::QueryInterface(IDebugControl) failed", __FUNCTION__, MB_ICONERROR);
        return;
    }
}

LPEXT_API_VERSION WDBGAPI ExtensionApiVersion(void) {
	return &g_ExtApiVersion;
}

DECLARE_API(demo_ext) {
    g_Control->ControlledOutput(DEBUG_OUTCTL_AMBIENT_DML, DEBUG_OUTPUT_NORMAL, "<col fg=\"srcpair\">Hello World from the WinDBG extension</col>\n");
}

STDMETHODIMP_(ULONG) EventCallbacks::AddRef(THIS) {
	InterlockedIncrement(&g_RefCount);
	return 1;
}

STDMETHODIMP_(ULONG) EventCallbacks::Release(THIS) {
	return 0;
}

STDMETHODIMP EventCallbacks::GetInterestMask(THIS_ OUT PULONG Mask) {
	*Mask = DEBUG_EVENT_LOAD_MODULE | DEBUG_EVENT_BREAKPOINT | DEBUG_EVENT_CHANGE_ENGINE_STATE | DEBUG_EVENT_EXCEPTION;
	return S_OK;
}

STDMETHODIMP EventCallbacks::Exception(THIS_ IN PEXCEPTION_RECORD64, IN ULONG FirstChance) {
	return DEBUG_STATUS_NO_CHANGE;
}

STDMETHODIMP EventCallbacks::ChangeEngineState(THIS_ IN ULONG Flags, IN ULONG64 Argument) {
	if (Flags == DEBUG_CES_EXECUTION_STATUS && Argument == DEBUG_STATUS_BREAK)
	{
		g_Control->Execute(DEBUG_OUTCTL_ALL_CLIENTS | DEBUG_OUTCTL_AMBIENT_DML, "!tt 0", DEBUG_EXECUTE_DEFAULT);
	}
}

STDMETHODIMP EventCallbacks::Breakpoint(IN PDEBUG_BREAKPOINT Bp) {
	return DEBUG_STATUS_NO_CHANGE;
}

STDMETHODIMP EventCallbacks::LoadModule(IN ULONG64 ImageFileHandle, IN ULONG64 BaseOffset, IN ULONG ModuleSize, _In_opt_ PCSTR ModuleName, _In_opt_ PCSTR ImageName, IN ULONG CheckSum, IN ULONG TimeDateStamp) {
	return DEBUG_STATUS_NO_CHANGE;
}
Note how on line 48, we are checking for the Flags and Argument to ensure that the end of the time
travel debugging trace has been reached. If both of the conditions meet our criteria, we call the
Execute function, which will execute a command within the command panel of WinDBG. In this
case we execute !tt0 which will reset our time travel pointer to the start of the trace
file ensuring we can start from the beginning once again.
Including additional functionality - Creating Breakpoints
Breakpoints are vital in terms of debugging applications and understanding what data is in the registers
and other memory locations at any given time whilst allowing a more fine-grained control over the
application's execution flow. Therefore, being able to set breakpoints is imperative. In order to set
breakpoints, we require an interface pointer to IDebugControl. Additionally, we need to
know on what we want to break, as well as any potential commands we automatically want to execute.
For this example, we want to gain an overview of all the modules that are loaded during runtime and
print these. Therefore, we are going to create a breakpoint on any call to LoadLibraryW. We
add a breakpoint command that will be executed once the breakpoint is hit. The goal of the command is to
display the value stored in the rcx register, which holds the module name. To add to that,
we also want execution to resume, so that we don't have to manually resume execution after each time the
value in the rcx register is printed to the command console. Thus, we will be using is:
dW rcx; g;. Now, we can build the code to create our breakpoint:
#include <windows.h>

#define KDEXT_64BIT
#include <wdbgexts.h>
#include <dbgeng.h>

#if defined(WIN32)
#pragma comment(lib, "Dbgeng.lib")
#endif

EXT_API_VERSION g_ExtApiVersion = { 1, 1, EXT_API_VERSION_NUMBER, 0 };
WINDBG_EXTENSION_APIS ExtensionApis = { 0 };
IDebugClient* g_Client = NULL;
PDEBUG_CONTROL g_Control = NULL;
PDEBUG_BREAKPOINT p_Breakpoint;


VOID WDBGAPI WinDbgExtensionDllInit(PWINDBG_EXTENSION_APIS lpExtensionApis, USHORT usMajorVersion, USHORT usMinorVersion) {
    if (DebugCreate(__uuidof(IDebugClient), (void**)&g_Client) != S_OK) {
        MessageBoxA(0, "DebugCreate() failed", __FUNCTION__, MB_ICONERROR);
        return;
    }

    if (g_Client->QueryInterface(__uuidof(IDebugControl), (void**)&g_Control) != S_OK) {
        MessageBoxA(0, "DebugClient::QueryInterface(IDebugControl) failed", __FUNCTION__, MB_ICONERROR);
        return;
    }
}

LPEXT_API_VERSION WDBGAPI ExtensionApiVersion(void) {
	return &g_ExtApiVersion;
}

DECLARE_API(demo_ext) {
    // [0] Add a new empty software-based breakpoint
	if (g_Control->AddBreakpoint(DEBUG_BREAKPOINT_CODE, DEBUG_ANY_ID, &p_Breakpoint) != S_OK) {
		g_Control->ControlledOutput(DEBUG_OUTCTL_AMBIENT_DML, DEBUG_OUTPUT_NORMAL, "<col fg=\"srcpair\">Setting Breakpoint failed with error: %d...</col≶\n", GetLastError());
	}

	// Once a Breakpoint has been added [0], it will be empty and additional items needed to be added to the object [1,2,3]
	// [1] Add the expression to the breakpoint, equivalent of "bp {modulename}!{functionname}" in WinDBG
	if (p_Breakpoint->SetOffsetExpression("kernelbase!loadlibraryw;") != S_OK) {
		g_Control->ControlledOutput(DEBUG_OUTCTL_AMBIENT_DML, DEBUG_OUTPUT_NORMAL, "<col fg=\"srcpair\">Setting Offset Expression failed with error: %d...</col>\n", GetLastError());
		g_Control->RemoveBreakpoint(p_Breakpoint);
	}

	// [2] Sets the command that should be executed on triggering the breakpoint
	if (p_Breakpoint->SetCommand("dW rcx; g;") != S_OK) {
		g_Control->ControlledOutput(DEBUG_OUTCTL_AMBIENT_DML, DEBUG_OUTPUT_NORMAL, "<col fg=\"srcpair\">Setting Breakpoint Command failed with error: %d...</col>\n", GetLastError());
		g_Control->RemoveBreakpoint(p_Breakpoint);
	}

	// [3] Add additional flags to the breakpoints, mainly the DEBUG_BREAKPOINT_ENABLED flag is important to ensure the breakpoint will be handled
	if (p_Breakpoint->AddFlags(DEBUG_BREAKPOINT_ENABLED) != S_OK) {
		g_Control->ControlledOutput(DEBUG_OUTCTL_AMBIENT_DML, DEBUG_OUTPUT_NORMAL, "<col fg=\"srcpair\">Setting additional flags on breakpoint failed with error: %d...</col>\n", GetLastError());
		g_Control->RemoveBreakpoint(p_Breakpoint);
	}
}
Note that any breakpoint created has no attributes, which you will have to set yourself using
SetCommand, SetOffsetExpression and other features not covered in this
example. Furthermore, each newly created breakpoint is disabled by default. This requires you to add a
flag to your breakpoint, flagging it as enabled. This will ensure that when you actually run the
debugging session, the breakpoint gets hit and performs any actions you have defined.
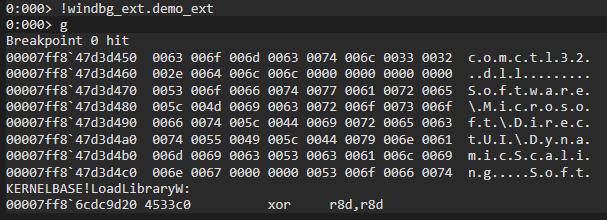
To demonstrate the success of our extension, we load a new debug session and launch Notepad.exe.
Subsequently, before we run the program, we import our extension and call the demo_ext
function that we expose. Notice how in the breakpoint window, a new software breakpoint has appeared
with the location at the entrypoint of the kernelbase!loadlibraryw function. Now that our
extension has been loaded, we can run the program by executing the command r and we will
see that the breakpoint gets hit automatically. Based on the output we can determine that one of the
DLLs loaded by Notepad.exe during the startup of the program is comctl32.dll.
Including additional functionality - Creating a Stacktrace
Stacktraces provide useful insights into the call stack of the application and allow us to gain an
insight into the execution flow based of off function calls. We can use our interface pointer to
IDebugControl to call GetStackTrace to obtain a stacktrace at any given
moment. For example, if we want to obtain a stacktrace when the execution flow reaches a specific
function. We could set a breakpoint on that function, create a EventCallback handler for the Breakpoint
event, in which we handle the creation of a stacktrace.
In the code example shown below, we build upon the previous code blobs and add functionality to the
EventCallbacks::Breakpoint EventCallback. Subsequently, using the framesSize
variable, we can decide how many frames within the stacktrace we want to receive. By requesting 2
frames, we will get the current frame and one previous frame, allowing us to determine the caller of
function we are currently at.
STDMETHODIMP EventCallbacks::Breakpoint(IN PDEBUG_BREAKPOINT Bp) {
	ULONG framesSize = 2;
	ULONG framesFilled = 0;
	// Allocate space for stackframes and request stacktrace
	DEBUG_STACK_FRAME* frames = (DEBUG_STACK_FRAME*)malloc(sizeof(DEBUG_STACK_FRAME) * framesSize);
	if (frames == NULL) {
		g_Control->ControlledOutput(DEBUG_OUTCTL_AMBIENT_DML, DEBUG_OUTPUT_NORMAL, "<col fg=\"srcpair\">DEBUG_STACK_FRAME allocation failed with error: 0x%08x</col>\n", GetLastError());
		return DEBUG_STATUS_NO_CHANGE;
	}
	memset(frames, 0, sizeof(DEBUG_STACK_FRAME) * framesSize);

	if (g_Control->GetStackTrace(0, 0, 0, frames, framesSize, &framesFilled) != S_OK) {
		g_Control->ControlledOutput(DEBUG_OUTCTL_AMBIENT_DML, DEBUG_OUTPUT_NORMAL, "<col fg=\"srcpair\">GetStackTrace failed with error: 0x%08x</col>\n", GetLastError());
		return DEBUG_STATUS_NO_CHANGE;
	}
}
Including additional functionality - Getting all symbol entries in a library
In the case where we are analyzing a third-party library imported by the application we are debugging,
it could occur that we would like to obtain a list of functions which are imported. For example, we
could iteratively get a list of all functions that are imported by kernel32.dll. To do so, we would
require an interface point to the IDebugSymbols3 interface in order to call
GetSymbolEntriesByName and subsequently loop over the returned entries and get the name by
calling GetSymbolEntryString. For this, we are once again relying on the Breakpoint
EventCallback assuming that we have set a breakpoint on kernelbase!, however we could also
rely on the LoadModule callback.
In the code snippet below, note that we need to request the interface pointer to IDebugSymbols3 before
we can call its functions. Additionally, we have to allocated our own buffers using the correct buffer
types, such as DEBUG_MODULE_AND_ID. In this example, I have hardcoded both
sImageNameWildCard and sImageNameExt for which there are undoubtedly neater
ways to solve this in a dynamic fashion when handling more than one DLL import. Lastly, in this example,
we just print each identified symbol in the command panel of WinDBG. Obviously, we could also perform
other interactions now that we have obtained this name, such as setting a breakpoint.
VOID WDBGAPI WinDbgExtensionDllInit(PWINDBG_EXTENSION_APIS lpExtensionApis, USHORT usMajorVersion, USHORT usMinorVersion) {
    if (DebugCreate(__uuidof(IDebugClient), (void**)&g_Client) != S_OK) {
        MessageBoxA(0, "DebugCreate() failed", __FUNCTION__, MB_ICONERROR);
        return;
    }

	if (g_Client->QueryInterface(__uuidof(IDebugSymbols3), (void**)&g_Symbols3) != S_OK) {
		MessageBoxA(0, "DebugClient::QueryInterface(IDebugControl) failed", __FUNCTION__, MB_ICONERROR);
		return;
	}
}

STDMETHODIMP EventCallbacks::LoadModule(IN ULONG64 ImageFileHandle, IN ULONG64 BaseOffset, IN ULONG ModuleSize, _In_opt_ PCSTR ModuleName, _In_opt_ PCSTR ImageName, IN ULONG CheckSum, IN ULONG TimeDateStamp) {
	ULONG numEntries = 0;
	ULONG bufOutSize = 0;
	char* psBuffer = NULL;
	DEBUG_MODULE_AND_ID* ids;
	std::string sImageNameWildCard = "kernel32!*";
	std::string sImageNameExt = "kernel32!";

	// In order to find all exported functions of a DLL, queries to GetSymbolEntriesByName and GetSymbolEntryString are made
	// GetSymbolEntriesByName is equivalent to querying "{modulename}!*" in WinDBG and returns all matching symbols.
	// The first time it will retrieve the amount of entries returned by the function and allocate sufficient memory
	if (g_Symbols3->GetSymbolEntriesByName(sImageNameWildCard.c_str(), NULL, NULL, NULL, &numEntries) != S_OK) {
		g_Control->ControlledOutput(DEBUG_OUTCTL_AMBIENT_DML, DEBUG_OUTPUT_NORMAL, "<col fg=\"srcpair\">GetSymbolEntriesByName failed for %s with error: %d...</col>\n", sImageNameWildCard.c_str(), GetLastError());
		return DEBUG_STATUS_NO_CHANGE;
	}

	if (numEntries != 0) {
		// Allocate the amount of entries retrieved by our prior call to GetSymbolEntriesByName and then retrieve the actual entries
		ids = (DEBUG_MODULE_AND_ID*)malloc(sizeof(DEBUG_MODULE_AND_ID) * numEntries);
		if (g_Symbols3->GetSymbolEntriesByName(sImageNameWildCard.c_str(), NULL, ids, numEntries, NULL) != S_OK) {
			g_Control->ControlledOutput(DEBUG_OUTCTL_AMBIENT_DML, DEBUG_OUTPUT_NORMAL, "<col fg=\"srcpair\">GetSymbolEntriesByName2 failed for %s with error: %d...</col>\n", sImageNameWildCard.c_str(), GetLastError());
			return DEBUG_STATUS_NO_CHANGE;
		}
		unsigned int i = 0;

		while (i < numEntries) {
			// With GetSymbolEntryString, all returned results by GetSymbolEntriesByName will be iterated over and their names will be returned
			// The first run will retrieve the stringsize returned by the function and allocate sufficient memory
			if (g_Symbols3->GetSymbolEntryString(&ids[i], 0, NULL, NULL, &bufOutSize) != S_OK) {
				g_Control->ControlledOutput(DEBUG_OUTCTL_AMBIENT_DML, DEBUG_OUTPUT_NORMAL, "<col fg=\"srcpair\">GetSymbolEntryString failed with error: %d...</col>\n", GetLastError());
				break;
			}
			if (bufOutSize != 0) {
				// Allocate the required buffer size to accommodate the result of GetSymbolEntryByString
				psBuffer = (char*)malloc(sizeof(char) * bufOutSize);
				g_Symbols3->GetSymbolEntryString(&ids[i], 0, psBuffer, bufOutSize, NULL);
				g_Control->ControlledOutput(DEBUG_OUTCTL_AMBIENT_DML, DEBUG_OUTPUT_NORMAL, "Current Symbol entry is: %s", psBuffer);

				if (psBuffer) {
					free(psBuffer);
				}
			}
			bufOutSize = 0;
			i++;
		}
	}
}
Small bonus - Creating 'help' command
In any case where we want others to be able to work with our created extension, we can add another API
to our code, which allows the end user to call "help" on our extension and get an overview of what
input is expected.
Important: Don't forget to add the "help" function to your *.def Module Definition
File, otherwise this API won't be exposed and your end users won't be able to call it.
DECLARE_API(help) {
	g_Control->ControlledOutput(DEBUG_OUTCTL_AMBIENT_DML, DEBUG_OUTPUT_NORMAL, "\nDemo Extension for WinDBG\n");
	g_Control->ControlledOutput(DEBUG_OUTCTL_AMBIENT_DML, DEBUG_OUTPUT_NORMAL, "By Grayman, https://graymanre.github.io\n\n");
	g_Control->ControlledOutput(DEBUG_OUTCTL_AMBIENT_DML, DEBUG_OUTPUT_NORMAL, "This debugging extension is a demonstration of how to create one using C++.\n\n");
	g_Control->ControlledOutput(DEBUG_OUTCTL_AMBIENT_DML, DEBUG_OUTPUT_NORMAL, "Usage: !demo_ext\n\n");
	g_Control->ControlledOutput(DEBUG_OUTCTL_AMBIENT_DML, DEBUG_OUTPUT_NORMAL, "\n\n");
}
Small bonus - Simplifying ControlledOutput
The attentive viewer will have noticed the prevalent amount of g_Control->ControlledOutput
calls in the previous code samples. One could write a small wrapper around this function and ease the
usage of the output function as demonstrated in the sample below. By implementing this feature, one
could simplify the call to, for example: Output("Sample output with less complexity"). If
multiple colors should be supported, which can be changed by changing the
DEBUG_OUTCTL_AMBIENT_DML parameter, one could either create multiple functions for each
color, or supply it as an argument to Output() instead.
void __cdecl Output(PCSTR Format, ...)
{
	va_list Args;
	va_start(Args, Format);
	g_Control->ControlledOutputVaList(DEBUG_OUTCTL_AMBIENT_DML, DEBUG_OUTPUT_NORMAL, Format, Args);
	va_end(Args);
}